Design Matters (Part 3) - Warping2018-07-02

Undoubtedly, part warping is a nightmare for both manufacturers and customers. It can affect the functionality of a part or lead to assembly failure. Generally, part warping is due to residual stress, which can be highly relevant to the choice of materials, dimensions of the part, and manufacturing conditions.

Warped part is mainly caused by the residue stress of the material
As we discussed in Effects of CNC Machining on Part Distortion, there are some tips to minimize the risk of warping:
1.) Lower the length to thickness ratio of the part design to be less than 10:1.
2.) Pre-heat treat the metal part prior to manufacture for stress relief.
3.) Choose the size of the cutters carefully, because the distortion scale of the workpieces will be directly proportional to the cutter size, given that feed, speed, depth of cut and material removal rates are the same.
4.) Adopt WEDM (Wire Electrical Discharge Machining) for production as it imposes nearly no stress on metal parts.
However, sometimes the design does not allow us to take these preventive actions. In that way, warping will be inevitable, and corrective actions will be necessary. Among all the corrective actions, straightening is a commonly used method. Apart from straightening the parts, it’s also crucial to have a consensus with the customer about the inspection methodology, so as to prevent further conflicts. See the case study below to get to know more about warping and how Apporo fixes this situation.
Case Study on Warping
Recently, one of our customers turned to us because of their warped parts. The distance .100" +/-.002" (.098" - .102") controls the depth between one surface in the midst of the parts, let’s say surface A, and the top of the tab at the end of the part. However, the parts were found out of tolerance as much as .015" - .025", which was too high. The actual measurement was .075" - .085". The customer thus looked for Apporo's assistance to fix this problem.
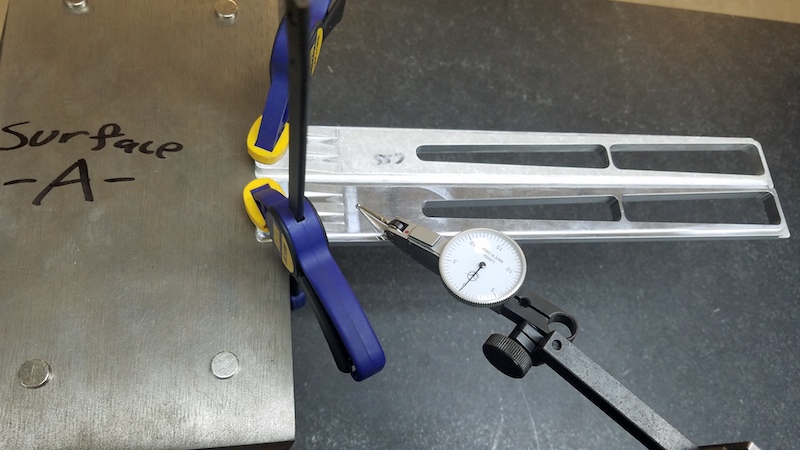
The issue with the parts is a direct resultant of the parts not being flat in relation to surface A. To dig into the problem, we had a part sitting on surface A. Then, we set an indicator to zero on the top of part. Finally, we had the indicator way down the part and the part raises .023" at the end of the part.

Part sitting on surface A
.jpg)
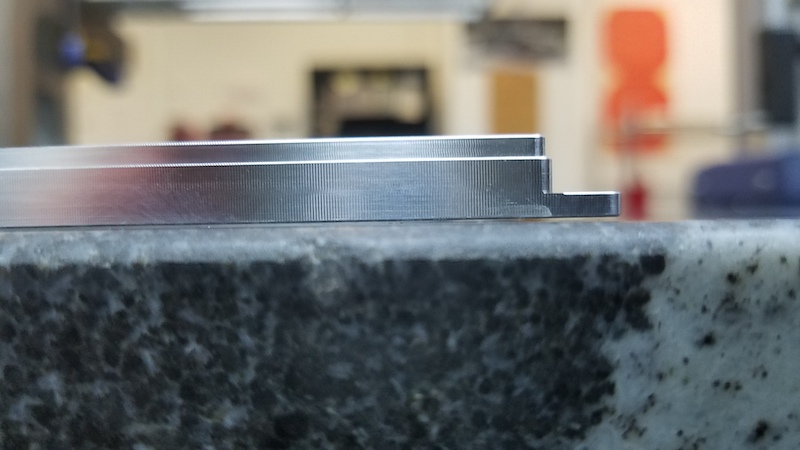
The above photo shows the difference in heights at the tips. Approved part is on the right.
Accordingly to our finding, the warp is mainly caused by the residue stress of the material which is inevitable situation. However, it can be fixed by straightening.
As for the inspection method on .100 +/-.002, the area of surface A is very small compared to whole part. Every tiny particle or burr around surface A shall be exactly removed prior to inspection, or it could result in giant dimensions variation on the other side of this part.
Alternative Inspection Methodology
Actually, to clamp the parts via surface A, 100% inspection would be definitely time consuming. For better efficient inspection, we proposed an alternative inspection methodology as below:
1.) We would use bottom surface as the base, instead of surface A. After straightening, the flatness of bottom surface could be within .002". Then, we put the bottom surface of part upside down on the granite surface plate.
2.) APPORO would manufacture customized inspection aids as block gauges to inspect the height of surface A and .100” +/-.002” surface.
Conclusion
Warping is usually inevitable, especially when we are machining part designed with ratio of length to thickness to be more than 10:1. By carefully and precisely straightening, the dimensions of part, the dimensions can be within tolerance with no doubt. At last, customer was happy with the reworked parts and willing to have another new project to cooperate with us. Trust our extensive experience in CNC machining services and we can offer good advice to help you get the best quality.
Learn more about residual stress: Stress Marks on the Surface of Plastic Injection Parts
